A sitemap of a website is similar to the table of contents of a book. Sitemaps are important because it guides web surfers to the particular part of the website they have a point of interest in. With it they would save time following links and get right to the point instead.
Sitemaps are also where search engines look at if somebody is looking for a particular keyword or phrase. If you have a site map, you can most likely be searched.
Creating a sitemap, now with software technology surging in, is relatively easier than before. You need not be a programming guru to be one. All need is a notepad, a program editor, and some patience. Here’s how you do it:
Create the listing on a notepad.
It doesn’t necessarily have to be a notepad. Any word processing program will do. First off, make sure to type in all the parts and pieces of your website. Include all pages and all links you have. Create it as if you listing the contents of your book. Make a draft first. You’re sure no to miss something out this way.
Create a new page for your sitemap.
You can insert the sitemap on your website on one of its pages or you can create an entirely different page for it. Using your notepad, incorporate all tags necessary to it to make another webpage. Open up your website creator program and tag your sitemap using it. If you have created your website on your own, this will be easy for you.
Create a link for the sitemap.
You won’t be able to view the sitemap if you won’t put a link for it, of course. Create the link on the front page of your website so that visitors can view it right away and be directed appropriately.
Check your work.
It is important to validate the functionality of the links you created on the sitemap. Test each and every one in there and if you get an error, be sure to fix it accurately. Run through every single page to make sure that all are accounted for.
Upload your work.
Place the sitemap now on your live browser and double check it. It should function as smoothly as the dry run. Error should be minimal at this stage since you already have verified it locally.
The steps provided herewith is the manual way of creating a sitemap. These days, if you search hard enough on the web, you will find online programs that will do all these work for you. All you have to do it type in the URL or the link of your website and they will create the sitemap with click of a button.
Of course that method is generic. All of you who have created their sitemap that way will have an end product that is all the same, plus there’s that possibility that something else will be inserted in there too. Then again, the process is less taxing and way, way simpler.
But if you want a more personalized output, and you are pretty good with computers and programming yourself, better make one of your own. And since you made your website anyway, creating sitemap is just like creating any other page on the website. Other than you’ll know for sure the links are accurate, you can organize the links the way you prefer it to be. Major parts of the site are emphasized compared to less significant. This is important especially if you are selling products or offering services online.
Sitemap is vital to a website. People search the web a lot for something. If your website has what that particular person is looking for, and your sitemap reports it, then you have a new customer looking at your items. Not only that, they will see some other things up for sale that they might be interested in as well.
Sitemaps, be it generated by a program automatically or you made it yourself, presents the same purpose. That is to lead your visitors to where they’re likely headed, and for you to be seen on the World Wide Web through search spiders. So with these, make sure your website has a sitemap of its own, lest make one.
Showing posts with label tutorial. Show all posts
Showing posts with label tutorial. Show all posts

FireFox Add-ons
What is FireFox Add-ons?
FireFox Add-on is improving the tabs directly adds to the browsing experience and letting you personalize your browsing experience which also make the job of website designers and developers much easier.
How to add-ons?
Add-ons is just simple as 1,2,3, let's start the ad-ons now
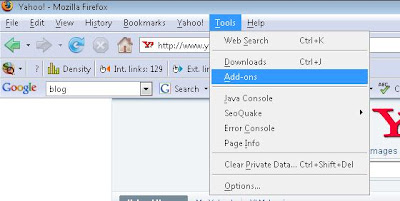
1. Go to "Tools", then choose "Add-ons"
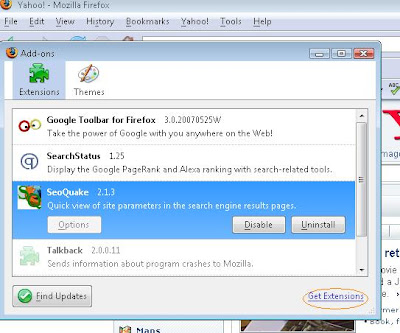
2. Click on the "Get Extensions"
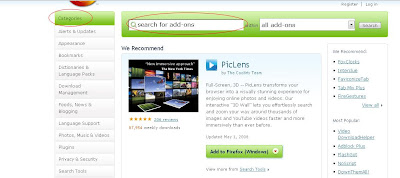
3.Choose either from the Categories or you can type the add-ons name and search. Besides, you can also find the "Added Recommend" and "Most Popular" add-ons
See, that's easy, only 3 steps.
FireFox Add-on is improving the tabs directly adds to the browsing experience and letting you personalize your browsing experience which also make the job of website designers and developers much easier.
How to add-ons?
Add-ons is just simple as 1,2,3, let's start the ad-ons now
1. Go to "Tools", then choose "Add-ons"

2. Click on the "Get Extensions"

3.Choose either from the Categories or you can type the add-ons name and search. Besides, you can also find the "Added Recommend" and "Most Popular" add-ons

See, that's easy, only 3 steps.
How to Join Bidvertiser to earn money
First, click on the below button to start your journey of earning.
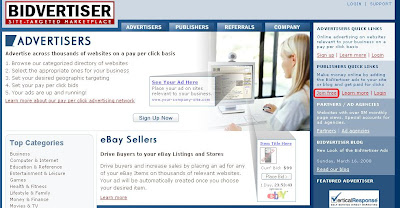
Then click on the Join free under PUBLISHERS QUICK LINKS
Fill in the form (Note: you can either get paid through Paypal with minimum $10 or
Check with minimum $50).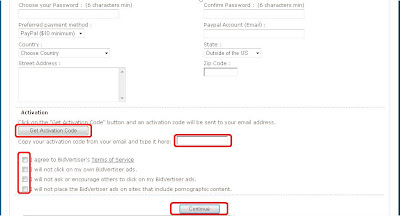 After fill in the details, Click the "Get Activation Code". After that bidvertiser will send the code to your email account. Once you get the activation code, paste it into the column after the "Copy your activation code from your email and type it here". Finally, tick on below items
- I agree to BidVertiser's Terms of Service
- I will not click on my own BidVertiser ads.
- I will not ask or encourage others to click on my BidVertiser ads.
- I will not place the BidVertiser ads on sites that include pornographic content.
After approved, then login to your account and start your setting.
First go to the MANAGE BIDVERTISERS, then choose the BidVertiser Center, you can see your website/blog on the bottom.
Click on the "Choose Template" to find the change your ads size and colour. Next, go to "Get Ads Code", copy and paste the code into your website or blog.
Now, your website / Blog start earning money for you.
Then click on the Join free under PUBLISHERS QUICK LINKS

Fill in the form (Note: you can either get paid through Paypal with minimum $10 or
Check with minimum $50).
 After fill in the details, Click the "Get Activation Code". After that bidvertiser will send the code to your email account. Once you get the activation code, paste it into the column after the "Copy your activation code from your email and type it here". Finally, tick on below items
- I agree to BidVertiser's Terms of Service
- I will not click on my own BidVertiser ads.
- I will not ask or encourage others to click on my BidVertiser ads.
- I will not place the BidVertiser ads on sites that include pornographic content.
After approved, then login to your account and start your setting.
First go to the MANAGE BIDVERTISERS, then choose the BidVertiser Center, you can see your website/blog on the bottom.
Click on the "Choose Template" to find the change your ads size and colour. Next, go to "Get Ads Code", copy and paste the code into your website or blog.
Now, your website / Blog start earning money for you.
Change the "NOFollow" to "DOFollow"
Blogger by default, and other blogging software such as WordPress, automatically adds the "nofollow" microformat extension to all links from user generated content. User generated content is defined as comments or external sources such as linkbacks and trackbacks.
How to removing "NoFollow" from your blogger template an make your blogger to "DOFollow" ?
Three step to remove the "NOFollow" form your template.
Step 1:
Login to your blogger dashboard and click on the Layout . Then, click on the Edit Html Sub-tab for Templates. Then tick on the Expand Widgets (As shown below)
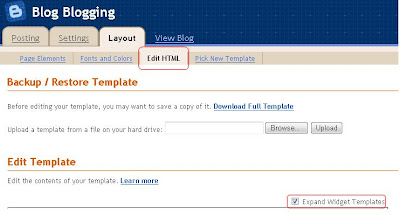
Now, you shall backup your template before go for the next.
Step 2:
After complete you back up, go for you templete and look for the rel='nofollow'

Step 3:
Delete the portion of the code that says rel='nofollow' and Save Your Template.
How to removing "NoFollow" from your blogger template an make your blogger to "DOFollow" ?
Three step to remove the "NOFollow" form your template.
Step 1:
Login to your blogger dashboard and click on the Layout . Then, click on the Edit Html Sub-tab for Templates. Then tick on the Expand Widgets (As shown below)

Now, you shall backup your template before go for the next.
Step 2:
After complete you back up, go for you templete and look for the rel='nofollow'

Step 3:
Delete the portion of the code that says rel='nofollow' and Save Your Template.
SP1 - Update Tutorial
Simple tutorial to update the Services Pack 1 (SP1) to Vista. Just 5 step and you can found the different on your computer speed.
Step 1:
Go to "Control Panel", then Choose the "Windows Update". After that click the "Install Updates".
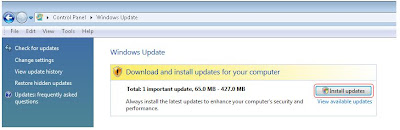
After click the "Install Updates", the system will start downoading the updates.
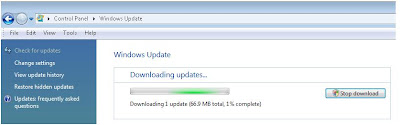
After updates completed download, the system will automatically preparing for the install
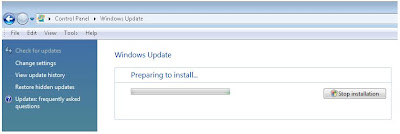
Step 2:
After the preparing install are done, pop up will occur as below shown. Click the "Next" to continue
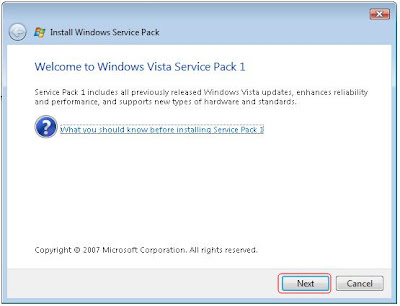
Step 3:
After that, tick on the "I accept the license terms" an then chek the "Next" to continue to next progress.
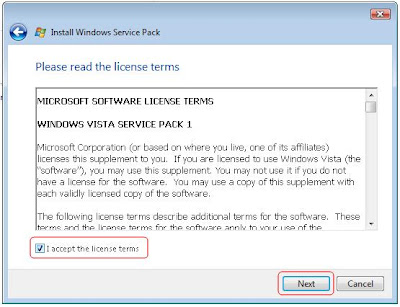
Step 4:
Well, Now is time to install the SP1, click the "install"
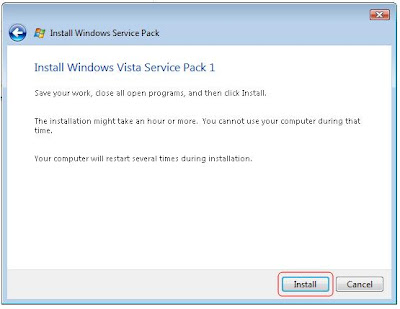
Now, the installing updates is progessing
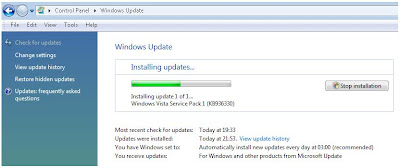
Step 5:
The restart are required after the installing updated done. Click the " Restart Now"
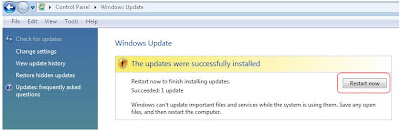
(Note: The system might restart 1~3 times automatically for the system update, and this process might take 20~60 minutes depend on your computer speed)
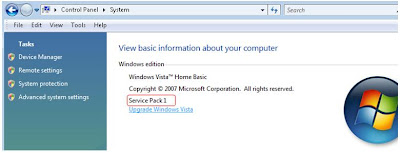
The update is completed. You can check it on the "Control Panel" >"System" and the "Service Pack 1" will appear if the update is success. (As shown below)
Step 1:
Go to "Control Panel", then Choose the "Windows Update". After that click the "Install Updates".

After click the "Install Updates", the system will start downoading the updates.

After updates completed download, the system will automatically preparing for the install

Step 2:
After the preparing install are done, pop up will occur as below shown. Click the "Next" to continue

Step 3:
After that, tick on the "I accept the license terms" an then chek the "Next" to continue to next progress.

Step 4:
Well, Now is time to install the SP1, click the "install"

Now, the installing updates is progessing

Step 5:
The restart are required after the installing updated done. Click the " Restart Now"

(Note: The system might restart 1~3 times automatically for the system update, and this process might take 20~60 minutes depend on your computer speed)
The update is completed. You can check it on the "Control Panel" >"System" and the "Service Pack 1" will appear if the update is success. (As shown below)

How to Create a blog with blogger?
How to Create a blog with blogger?
Just few simple step to guide you the way on creating blogger.
If you are new in blogger, this might definately help you.
Just few simple step to guide you the way on creating blogger.
If you are new in blogger, this might definately help you.
Generate and manage Adsense Ads
If you still confuse in generating code or managing ads, or you wanna confirm what you do is right. Then, let's the below Video show you step by step.
After the video, you are started your Adsense journey.
After the video, you are started your Adsense journey.
Set Up Adsense Ads
Once you have been approved as an adsense publisher, you need to set up your ads.
You can found there are 3 types of ads you can choose. So, how is the different and how you going to earn from it?
1.AdSense for content
Automatically crawls the content of your pages and delivers ads (you can choose both text or image ads) that are relevant to your audience and your site content—ads so well-matched, in fact, that your readers will actually find them useful.
You will get paid when someone click on the ads display by google.
2.AdSense for search
Allows website publishers to provide Google web and site search to their visitors, and to earn money by displaying Google ads on the search results pages.\
You will only get paid when the visitor using your google search engine and they do click on the google ads which display on the page after searching.
3. Adsense for Referrals
You can choose the product you want. Please take noted that you must careful during make a referrals ads. Aim on country and language your website/blog focus on, this is the way to provide you the best money.
You will not get paid even the visitor click on your referrals buttons. You only will get paid when the right visitor lead/buy the product/website, you need to get the details of the product before you set it as your referrals.
Finally, maybe you will ask what to choose and which is better?
Sorry to said that it is depend. However, there are some tips for you to refer to.
We do it step to step. More information and Tips are coming soon.
You can found there are 3 types of ads you can choose. So, how is the different and how you going to earn from it?
1.AdSense for content
Automatically crawls the content of your pages and delivers ads (you can choose both text or image ads) that are relevant to your audience and your site content—ads so well-matched, in fact, that your readers will actually find them useful.
You will get paid when someone click on the ads display by google.
2.AdSense for search
Allows website publishers to provide Google web and site search to their visitors, and to earn money by displaying Google ads on the search results pages.\
You will only get paid when the visitor using your google search engine and they do click on the google ads which display on the page after searching.
3. Adsense for Referrals
You can choose the product you want. Please take noted that you must careful during make a referrals ads. Aim on country and language your website/blog focus on, this is the way to provide you the best money.
You will not get paid even the visitor click on your referrals buttons. You only will get paid when the right visitor lead/buy the product/website, you need to get the details of the product before you set it as your referrals.
Finally, maybe you will ask what to choose and which is better?
Sorry to said that it is depend. However, there are some tips for you to refer to.
We do it step to step. More information and Tips are coming soon.
Get Start with Adsense in 3 simple steps
To get started with AdSense, follow the steps below:
Step 1
You should have a blog/website to start earning with adsense. If you don't, then you can go to http://www.blogger.com/ for your free blog or http://pages.google.com/ for you free website.
Step 2
Go to google.com/adsense, then click the Sign Up Now and fill up your details.
Step 3
After submit your application, you need to verify your email address by click the verification link sent by google. Your application status will be update in several days, and you can start to earn with Adsense once approved.
Step 1
You should have a blog/website to start earning with adsense. If you don't, then you can go to http://www.blogger.com/ for your free blog or http://pages.google.com/ for you free website.
Step 2
Go to google.com/adsense, then click the Sign Up Now and fill up your details.
Step 3
After submit your application, you need to verify your email address by click the verification link sent by google. Your application status will be update in several days, and you can start to earn with Adsense once approved.
Subscribe to:
Posts (Atom)